
EIGHTTRACK AUDIO / JOURNAL
EQ and Compression in Eighttrack Console: A Practical Guide
Learn what Console’s built-in three-band EQ, filters, and compressor do, and how to use them to shape tone and control dynamics.
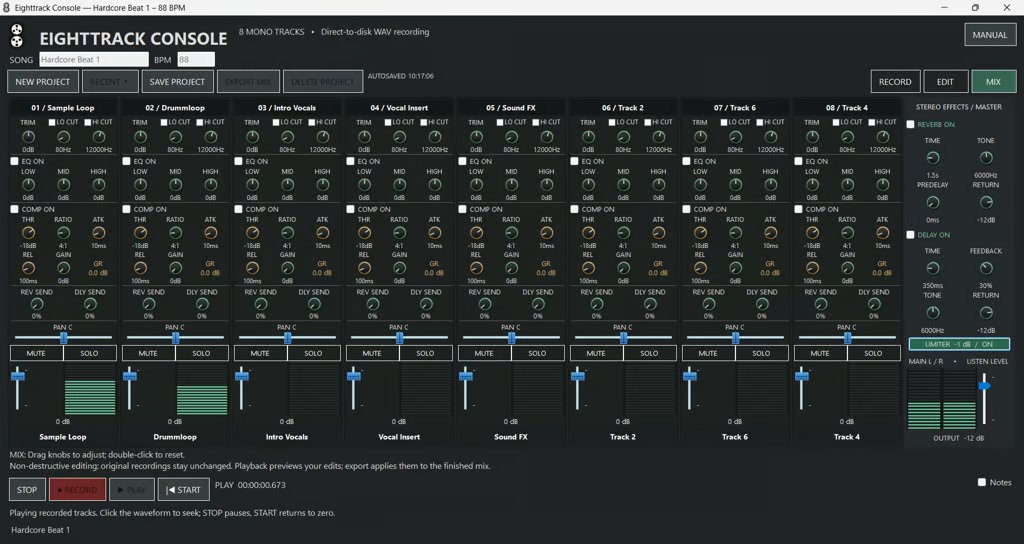
EQ and compression solve different mixing problems. EQ changes the balance of low, middle, and high frequencies. Compression controls changes in level over time. In Eighttrack Console, both are built into each channel in Mix view, so you can shape individual tracks while hearing how they work together.
Start with the mix, not the knobs
Open Mix view and get a rough balance with the channel faders and pan controls. Listen to a representative section of your song. Decide what needs attention: is a voice too heavy, a guitar too bright, or a bass part jumping forward on certain notes? Give each adjustment a purpose. A track that already fits may need very little processing.
Find Console’s channel controls
Each channel has TRIM, LO CUT and HI CUT filters, an EQ ON switch with LOW, MID and HIGH controls, and a COMP ON switch. The compressor exposes THR, RATIO, ATK, REL and GAIN, with a GR readout. Drag the knobs to adjust them; double-click a knob to reset it. The optional Vintage Skin changes their appearance, not their operation.
EQ: shape the tone
Enable EQ ON to use the three-band EQ. LOW adjusts the lower part of the sound, MID shapes its middle range, and HIGH adjusts its upper range. Positive dB values boost a band; negative values cut it. At 0 dB, a band applies no boost or cut. Try small moves first, such as 1–3 dB, and listen with the other tracks playing.
For a vocal that feels too heavy, try a small LOW cut. If a guitar sounds overly forward or boxy, test a gentle MID reduction. A small HIGH boost can add brightness, while a cut can soften an overly bright track. These are listening experiments, not presets: the useful direction depends on the recording.
LO CUT and HI CUT: remove unwanted extremes
Console provides separate filter switches and frequency controls. LO CUT reduces frequencies below its cutoff, which can help reduce low rumble where that low end is not part of the instrument. HI CUT reduces frequencies above its cutoff, useful when a track has more top end than the mix needs. Move the cutoff gradually and back off if the source loses body or detail. Be especially careful with LO CUT on bass and kick tracks.
Compression: make levels more consistent
Enable COMP ON when a track’s louder moments need control. THR sets the level above which compression acts; RATIO determines its strength. ATK sets how quickly gain reduction develops, and REL sets how quickly it recovers. GAIN adjusts the level after compression. GR shows the amount of gain reduction taking place.
Lowering THR generally makes more of the performance trigger compression. A higher ratio applies stronger control. Faster attack can restrain sharp peaks; slower attack can preserve more of the initial hit. Release changes how naturally the level recovers between notes or phrases. Use GAIN to make a fair loudness comparison with compression switched off.
What does a ratio such as 4:1 mean?
The ratio describes how much a signal can rise above the threshold after compression. It applies to the part above the threshold, not to the whole track’s volume. Read 4:1 as “four to one”: a 4 dB rise above the threshold becomes roughly a 1 dB rise at the output once compression has settled, before adding GAIN.
1:1 — No level reduction from the ratio.
2:1 — An input 4 dB above the threshold becomes about 2 dB above it: gentle control.
4:1 — An input 4 dB above the threshold becomes about 1 dB above it: stronger control.
8:1 — An input 8 dB above the threshold becomes about 1 dB above it: firmer control of peaks.
A 4:1 example in Console
Set THR to −18 dB. If a sustained input reaches −10 dB, it is 8 dB above the threshold. At 4:1, divide those 8 dB by four: the output is about 2 dB above the threshold, or −16 dB, before GAIN. That is about 6 dB of gain reduction. These are simplified, settled-level examples; attack and release affect what happens during a changing performance.
A higher ratio does not automatically make a better mix. Start gently, lower THR until compression responds to the louder moments, and use GR to see how much control you are applying. If the performance feels flattened, try a lower ratio or raise the threshold.
A gentle starting point
On a vocal or bass track, try a ratio around 2:1 or 3:1, an attack around 10–30 ms, and a release around 80–150 ms. Lower THR until louder passages show roughly 2–4 dB of gain reduction. These are suggested starting points, not Console defaults or settings every track needs. Adjust by ear as the whole mix plays.
If the sound loses punch, try a slower attack or less gain reduction. If the level audibly swells and dips, revisit the release and threshold. If quiet room noise becomes too noticeable after increasing GAIN, use less compression and gain. Compression does not remove noise or repair a clipped recording.
Compare, then stop when it works
Toggle EQ ON and COMP ON separately to hear what each change contributes. Keep the comparison at a similar perceived volume so louder does not automatically seem better. Watch the channel and master meters, leave headroom, and revisit the fader balance after processing. The goal is a track that fits the song while keeping its character.
Keep your decisions with the project
Save your .8track project to retain your mixer settings. The Demo lets you explore recording, editing, and mixing; audio export is available in the Full Version. Use Console’s included PDF manual for application instructions and keyboard shortcuts.